Thursday, 20 December 2012

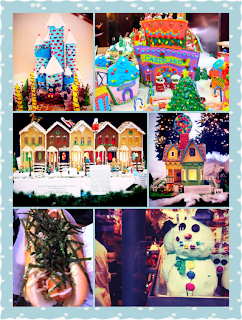
The Great PW Gingerbread Field Trip

~The Great PW Gingerbread Field Trip~

We went to the Hyatt Hotel, Thierry Chocolate Patisserie, and Rocky Mountain Chocolate Factory. Then, we went out for a Food Cart Lunch. It was such a fun day in downtown Vancouver !!! (Except for the fact that it was raining....)

The gingerbread houses were so unique and eye-catching. I liked the desserts  at Thierry Chocolate Patisserie. I've tried one of their cakes before and its yummyyy (: I go to Rocky Mountain Chocolate Factory often with my friends so I didn't have any surprises there. I liked the Japadog lunch I had because I haven't eaten Japadog since like FOREVER !

Friday, 14 December 2012

Hot Cocoa with Homemade Marshmallows

~Hot Cocoa with Homemade Marshmallows~

Hot Cocoa:

Ingredients:
-125mL sugar
-50mL Cocoa Powder
-Dash of salt
-80mL hot water
-1L 2% milk
-4mL vanilla extract*

Method:
1. Stir together sugar, cocoa and salt in medium saucepan; stir in water.
2. Cook over medium heat, stirring constantly, until mixture comes to a boil.
3. Boil and stir 2 minutes.
4. Add milk; stirring constantly, heat to serving temperature. Do Not Boil.
5. Remove from heat; add vanilla*. Whisk until mixture is foamy.
6. Serve topped with marshmallows.

*Variations for flavouring: Add one of the following with the vanilla extract
-SPICED COCOA: dash of ground cinnamon and dash of ground nutmeg. Serve with a cinnamon stick if desired.
-MINT COCOA: 2mL mint extract OR 45mL crushed hard peppermint candy. Serve with peppermint candy stick, if desired.
-CITRUS COCOA: 2mL orange extract.
-SWISS MOCHA: 10mL powdered instant coffee.
-CANADIAN COCOA: 2mL maple extract.

Homemade Marshmallows:

Ingredients:
-1 package unflavored gelatin
-80mL cold ice water, divided
-125mL sugar
-80mL light corn syrup
-one small pinch salt
-1.5mL vanilla
-20mL icing sugar
-20mL cornstarch
-non stick cooking spray

Method:
1. Place the gelatin into a medium bowl along with 40mL of the water.
2. In a small saucepan, combine the remaining 40mL water, sugar, corn syrup, and salt. Place over medium heat, cover, and cook for 3-4 minutes. Uncover and, using a candy thermometer, cook until the mixture reaches 240°F or 115°C, about 7-8 minutes. Once the mixture reaches this temperature, IMMEDIATELY remove from the heat.
3. With the electric mixer running at low speed, slowly pour the sugar syrup down the side of the bowl into the gelatin mixture. Once all of the syrup has been added, increase the speed to high. Continue to whip until the mixture becomes very thick and is lukewarm, approximately 12-15 minutes. Add the vanilla during the last minute of whipping.
4. While the above mixture is whipping, prepare the pan as follows:
    For regular marshmallows: combine the icing sugar and cornstarch in a small bowl. Lightly spray a small square cake pan with cooking spray. Add the sugar and cornstarch mixture and move it around in the pan until it completely coats the bottom and sides of the pan. Return the remaining mixture to the bowl for later use. When ready, pour the mixture into the prepared pan, using a lightly oiled spatula for spreading evenly into the pan. Dust the top with enough of the remaining sugar/cornstarch mixture to lightly cover. Reserve the rest for later. Allow the marshmallows to sit for at least 4 hours and up to overnight. Turn the marshmallows onto a cutting board and cut into 2.5cm squares with a knife dusted with the sugar/cornstarch mix. Once cut, lightly dust all sides of each marshmallow with the remaining mixture.
    For miniature marshmallows: combine the icing sugar and cornstarch in a small bowl. Line a jelly roll pan with parchment paper: spray the paper with nonstick spray and dust with the icing sugar mixture. Scoop the mixture into a piping bag fitted with a 1.25cm/.5 inch round piping tip. Pipe the mixture onto the pan lengthwise, leaving 2.5cm/1 inch between each strip. Sprinkle the tops with enough remaining cornstarch and sugar mixture to lightly cover. Let set for 4 hours or up to overnight. Cut into 1.25cm/.5 inch pieces with a knife dusted with sugar/cornstarch mix. Once cut, lightly dust all sides of each marshmallow with the remaining mixture.

Note: these marshmallows can be stored in an airtight container for up to a week.
Monday, 10 December 2012

Banana Splitsville

~Banana Splitsville~

Ingredients:
Basic Caramel Software:
-500mL sugar
-250mL water
-1 tbsp light corn syrup

Caramel Sauce Software:
-1 batch caramel (above)
-500mL heavy cream (whipping cream)

Banana Brulee Software:
-4 bananas
-Sugar for coating

Additional Splitsville Software:
-Ice cream of your choice

Method:
1. Combine the sugar, water, and corn syrup in a small, heavy saucepan and place over high heat. As soon as the sugar has dissolved, heat your thermometer under warm tap water (to prevent thermal shock) and attach to side of pan, making sure that the bulb is completely submerged. Do not stir the mixture or agitate the pan at this stage.
2. When the mixture reaches 230°F (110°C), reduce the heat to medium and allow the sugar to color gradually. As the temperature approaches 300°F (150°C) the color will start to turn to amber. At this point, it's safe to swirl the pan gently to help distribute the heat evenly. As the caramel heads towards 340°F (170°C), it will reach a deep amber color.
3. Remove the pan from the heat and slowly stir with a metal spoon, allowing it to cool until the caramel falls from the spoon in a solid stream, like a string.
    When it does, it's doodad time.
4. Form doodads by holding the spoon 12 to 16 inches over the caramel and drizzling the patterns on the parchment. (Hint: allow the spoon to unload into the pan for a few seconds before attempting doodad. This will allow a narrower stream.)
    Quick back and forth motions or side to side movements are best.
    It's all in the wrist. Allow doodads to cool for 15 minutes then peel the paper off (not the other way around). Stack in an airtight container with wax paper between each piece.
5. After making 15 to 20 doodads, you should have sufficient caramel remaining to move on to the sauce phase.
    So, return the remaining caramel to medium high heat and continue cooking until you see the first sign of smoke. Immediately remove from the heat, and add the cream, all at once, at arms length. (It will boil furiously.)
    Once the mixture calms down, return to medium heat and boil 3 more minutes, stirring occasionally. Cool to room temperature, move to squirt bottle and refrigerate for up to a week.
6. To make the bananas brulee, quarter the bananas (peel on) and rub into sugar to coat thoroughly.
    Remove peel and place on cooling rack over several layers of foil.
    (Don't try this on your dining room table.) Don your safety googles and fire up your torch.
    Hold the torch so that the very tip of the flame barely touches the banana, and move quickly back and forth until the sugar melts, turns brown, and bubbles. As soon as it looks like caramel, move on. You know you've got it down when a solid, glasslike sheet of gold (no graininess) has formed on the banana.
7. To do the split (so to speak), squirt a pattern of caramel sauce on a chilled plate, top with 4 banana pieces (Lincoln log style), top with the ice cream of your choice and finally, a doodad.

Tuesday, 4 December 2012

Easy Nut Brittle

~Easy Nut Brittle~

Ingredients:
-250mL sugar
-125mL corn syrup
-f.g. salt
-250mL nuts
-5mL butter
-5mL vanilla
-5mL baking soda

Method:
1. Spray a jelly roll pan with non-stick spray.
2. In large glass bowl or measuring cup, stir sugar, corn syrup and salt with a wooden spoon.
3. Microwave on high until syrup is pale yellow (about 5-8 minutes).
4. Add nuts and then put back into the microwave 1 minute more.
5. Immediately stir in butter, vanilla, baking soda.
    The mixture will be foaming.
6. Quickly and carefully pour into the jellyroll pan.
    Spread the brittle evenly across the jellyroll pan.
7. When the brittle is completely cooled break into pieces.

*Warnings*
-The heated syrup will be VERY hot.
-Use cautions when moving the measuring cup or stirring the mixture!
-Do not touch the mixture while pouring it onto the jellyroll pan.
-Do not immerse the glass-measuring cup in water until it is entirely cool.